Nintendo DS Lite : Repair a broken console (blown fuse)
I. Disclaimer
First, you need to know if your DS has a fuse problem. It has been
reported that DS Lite with blown fuse(s) starts with the Power LED on
and immediately shutdown. If you're not sure you have the same problem
and still want to try bridging fuses, you can do so. I'm not reponsible for any damage caused to your device. If you're not sure about what to do, stop it.
However, you shouldn't get in trouble as your remove the battery and power plug during the manipulation.
However, you shouldn't get in trouble as your remove the battery and power plug during the manipulation.
II. What you need
- Two DS Lite
- A tri-wing screwdriver (to open the DS)

- Thin wire (to replace the fuse, should be QUITE THIN)
- An iron solder (to solder the small wire replacing the fuse)

- Wire solder (also used during solder)

III. Open the two DS
- Remove the battery cover
- Remove the battery
- Unscrew every tri-wing screws with the screwdriver

IV. Finding F1 & F2 fuses
To find the F1 and F2 fuses, take a look on the DS motherboards pictures below (there are several kinds) and locate them on your DS too.
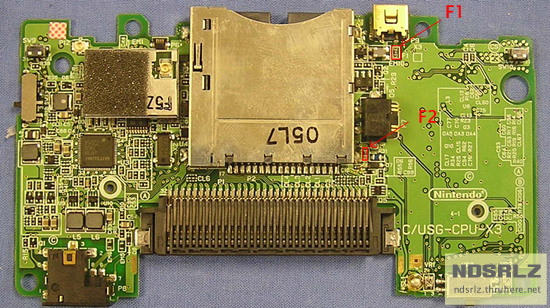
These are DS Lite motherboards with different serials (USG-CPU-01 and USG-CPU-X3).


These pictures are from an old DS (serial NTR-CPU-01), in case you want to repair one.
V. Testing and bridging fuse(s)
As I don't know what kind of fuse are used in the DS and as users
reported that using wire to bridge the fuse wasn't harmful, I'll
explain you with this method.
You should first check with a multimeter which fuse is blown, then bridge it. Most of the time, F2 fuse is the blown one.
Take a look at the pictures below. The first one is a zoom upon the F2 fuse.
The second explains you where to solder.
You should first check with a multimeter which fuse is blown, then bridge it. Most of the time, F2 fuse is the blown one.
Take a look at the pictures below. The first one is a zoom upon the F2 fuse.
The second explains you where to solder.
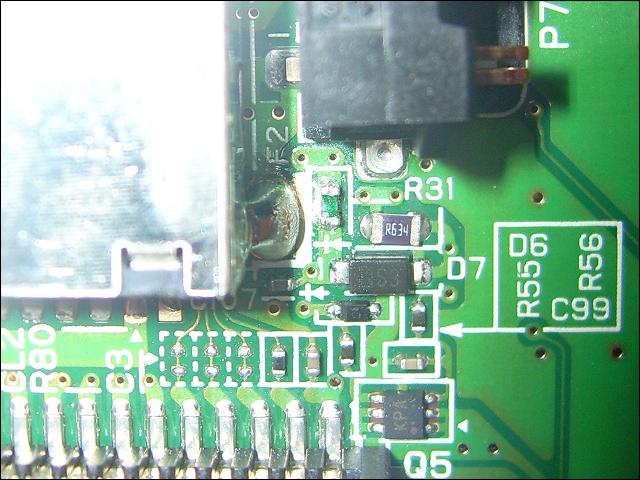

The red line represents the small wire. It has to touch both contacts.
Now solder by doing two little points of wire solder (represented by the blue squares).
After soldering the blown fuses, assemble your DS back and try to start it.
Your DS should work after that :).
Thanks to scdev.org members for information (bitblt for F2 pictures too).
Now solder by doing two little points of wire solder (represented by the blue squares).
After soldering the blown fuses, assemble your DS back and try to start it.
Your DS should work after that :).
Thanks to scdev.org members for information (bitblt for F2 pictures too).
